7.2. Configuring Your Desktop Operating System
The dialog box where you configure your desktop differs from operating system to operating system and version to version. As an example, in Microsoft Windows 95 or 98, client configuration occurs in the "Properties" dialog box associated with the TCP/IP protocol for your ethernet adapter. To get there, go to the "Control Panel" and select "Network". If a TCP/IP protocol is not yet associated with your ethernet adapter, you may need to add one before you can configure its properties with the following information.
| Item | Description | What to enter |
|---|---|---|
| enable TCP/IP protocol | All your computers must communicate on the network using the TCP/IP protocol. | In Windows you add a TCP/IP protocol. In Apple, open TCP/IP Control Panel. |
| disable non-TCP/IP protocols | Unless an application relies on a non- TCP/IP protocol, disable all other protocols. | Turn "off" other networking protocols (e.g. NetBeui, etc.) |
| enable DHCP service | See section below | In Windows, enable "Obtain an IP address service automatically". In Apple, select "DHCP server". |
| Note | |
|---|---|
|
We strongly recommend that you configure all clients machines using DHCP rather than manually using static IP addresses. Should you ever need to change network settings or troubleshoot your network later, you will find it much easier to work in an environment where addresses are automatically assigned. |
On a Windows 95/98 system, the window will look like the image below.
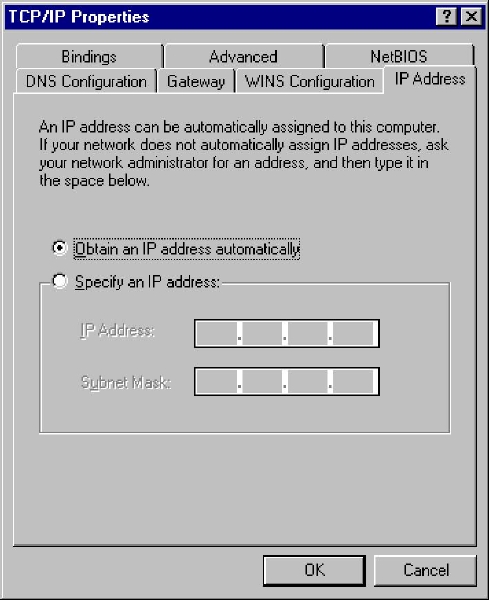
7.2.1. Automatic DHCP Service
Your server provides a DHCP server that assigns each of the computers on your network an IP address, subnet mask, gateway IP address and DNS IP address(es). For a more detailed explanation of DHCP, consult the section in the Chapter 5 called "Configuring Your DHCP Server".
| Note | |
|---|---|
|
In some rare cases, you may want to use a static IP address for a particular client machine. The typical approach is to manually enter this IP address into the network properties of the specific machine. The negative side of this approach is that you cannot easily change or alter network settings without having to go in and modify the information on the client machine. However, it is possible to provide this static IP address directly through DHCP rather than manually configuring the client computer. To do so, you will first need to determine the Ethernet address of the client computer (usually through the network properties). Next you will go to the Hostnames and addresses web panel of the server manager and enter the information there. |
| Important | |
|---|---|
|
Only One DHCP Server It is imperative that no other DHCP server is on your network. If a former DHCP server configured your computers, you should remove that DHCP server from your network. Leave DHCP enabled, and reboot each computer. New IP addresses, netmasks, gateway IP addresses and DNS addresses will be assigned automatically by the server DHCP server. |
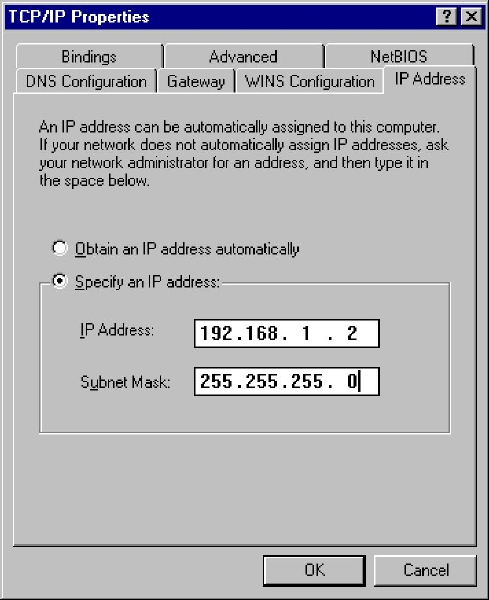
7.2.2. Manual entry for computers not using DHCP service
As noted above, we strongly recommend that you perform all your client configuration using DHCP. It is even possible to assign a static IP address through the Hostnames and addresses web panel of the server manager that will be distributed through your DHCP server.
However, if your computers do not support DHCP, you must manually enter the following information into your TCP/IP properties:
| Item | Description | What to enter |
|---|---|---|
| IP address | Manually enter this information (see paragraph below). | You must assign a different, unique IP address to computers not accepting DHCP (see note below). |
| subnet mask (or netmask) | Manually enter this number. | The default subnet mask (or netmask) is "255.255.255.0". |
| gateway IP address | Enter the IP address for the server or, in the case of server-only mode, enter the IP address for your network's gateway (e.g. the firewall or network router). | If you are running in server and gateway mode, your server is your local network's gateway. Enter its IP address here: the default is "192.168.1.1". If you are running in server-only mode, enter the IP address for the device interfacing with your external network. |
| IP addresses of yourdomain name servers | Manually enter this information. | Normally you would just add the IP address for your server - the default used in the server console is "192.168.1.1". If you have a firewall other than your server that restricts internal queries to Internet DNS servers, you may need to enter additional DNS servers here. |
It is critical that every computer on your network has a unique IP address and that you don't assign two computers the same address. In enabling DHCP service in the server console, you designated a range of IP addresses for DHCP assignment. You also allocated a block of IP addresses for manual assignment. If you accepted the defaults pre-configured into the server console, IP addresses 192.168.1.2 through 192.168.1.64 will have been set aside for manual entry. To avoid duplication, use only those IP addresses when manually assigning IP addresses to your computers.
After configuring the TCP/IP parameters, you may need to reboot your desktop computer to implement the configuration changes. (For example, most Windows systems need to be rebooted after the TCP/IP configuration has been changed.) Once the settings take effect, your computer will be connected to the server and to the Internet.
7.2.3. MS Windows workgroup configuration
If you are using a Microsoft operating system, you must ensure that your workgroup is the same as the workgroup name of your server. (The default workgroup name is your domain name. In a subsequent chapter, we'll explain how this can be changed using the web-based server manager.) If you are using the default name, go to the Control Panel, select "Network" and then select "Identification". In the field for "Workgroup", type your domain name.
| Note | |
|---|---|
|
A word about domain names Once you've set up your server, there's typically a delay of one or more days before your ISP publishes your domain address records (the domain name or names and the associated numerical IP address) so that the information is accessible to other computers on the Internet. Until it does, incoming mail won't be able to find you and computers elsewhere on the Internet won't be able to contact your server using your domain name (for example, www.yourdomain.xxx). However, on your local network you should be able to connect to your server using the short names of 'www' (for web access) and 'mail' (for e-mail clients). |