13.5. Hostnames and addresses
- 13.5.1.Creating New Hostnames
- 13.5.2.Reserving IP Addresses Through DHCP
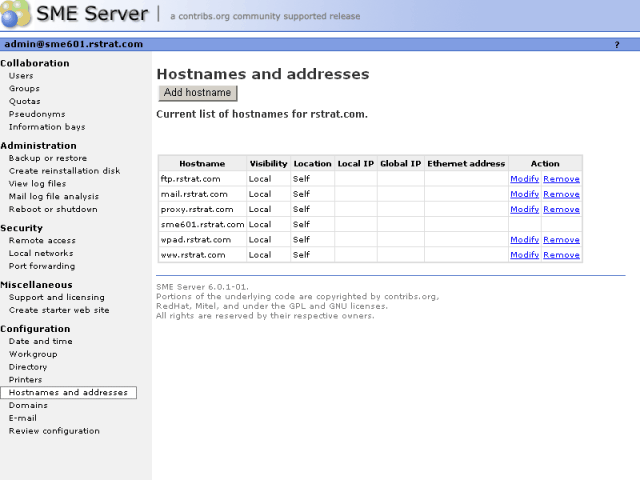
When you installed your SME Server, you were asked to provide a name for your system. That name and several other "standard" names are automatically configured in your system's host table during the installation process. This host table is consulted as part of the name resolution process. The "Hostnames and address" web panel allows you to modify this table and specify different host "names" for each domain on your system, as well as to control how those names resolve both for systems on your local network and also for systems on the larger Internet.
For instance, when someone tries to connect to "www.mycompany.xxx", they will be taken to wherever "www" has been set to point to. As seen in the image below, this screen in the server manager allows you to view these default settings, and also to modify the configuration.
You would first change the location to "Remote" and then enter the IP address of your ISP's server in the field marked "Global IP".
13.5.1. Creating New Hostnames
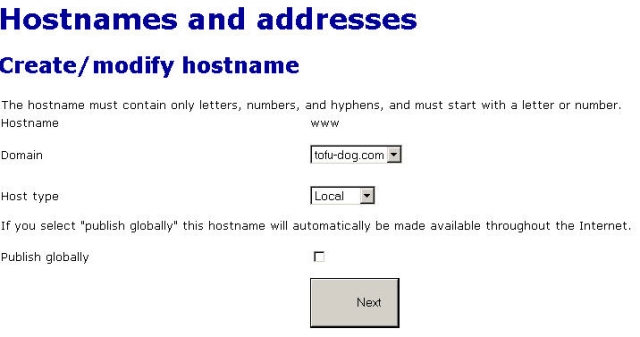
Creating new hostnames simply involves selecting one of the links at the top of the Hostnames and addresses panel and filling out the appropriate fields.
Note that if your system is configured with any virtual domains, you will have the choice of the domain in which you want to create the hostname. This allows you, for instance, to have "www.tofu-dog.com" pointing to one IP address and "www.mycompany.xxx" pointing to a completely separate IP address.
The hostnames you can create on this panel fall into three categories:
Additional names for your server: For instance, you might want to set up "intranet.mycompany.xxx" to point to your server. All you do here is enter the hostname and, if appropriate, choose the domain for the hostname.
Remote hosts: As mentioned in the example earlier, you might want to point a hostname such as "www" to a remote system. While "www" is created by default, you can create other names such as "home", "research", or any other appropriate name. In the form, you simply enter the hostname, choose the domain, and enter the remote IP address.
Local hosts: This screen is a bit more complicated because you have more options. At a basic level, you can create a hostname in a domain that points to another computer on your local network. To do this, just type in the hostname and enter the IP address in the "Local IP" field. For instance, you might want "research" to point to a computer system inside your network.
Where this gets complicated is when you want "research.mycompany.xxx" to be accessible both inside and outside your local network. The challenge is that your local IP addresses are only accessible inside your network. For that reason, the target computer system will need to have two network interface cards - one connected to the internal network and one connected to the external network. You would then enter both IP addresses in this screen in the "Local IP" and "Global IP" fields.
| Note | |
|---|---|
|
The "Ethernet address" field when creating a hostname pointing to a local host is only used for reserving IP addresses through DHCP as mentioned in the next section. |
13.5.2. Reserving IP Addresses Through DHCP
Another task you can perform through this panel is to reserve an IP address for a given system based on its Ethernet address. For instance, you might have another intranet web server within your company that you want to always have the same IP address. One method of assigning that address is to manually configure the client machine to have a static IP address. The negative aspect of doing this is that if you later want to change the network settings for that machine, you must manually go and configure that machine. An example would be if one of your DNS servers changed its IP address. Additionally, you have to keep track somewhere of the fact that you have assigned a specific IP address to that machine.
Rather than configuring the machine manually, you can reserve an IP address from the DHCP server for that specific machine. This has the same result as manually configuring a static IP address, but offers two benefits. First, you have one location to keep track of all assigned static address. Second, through the DHCP server you will provide network settings. If you wish to change those settings, the change can be simply done on your server. All DHCP clients will then receive those updated changes when they renew their DHCP-provided addresses.
To reserve an IP address, you must first determine the Ethernet address of your client system. Windows NT/2000 users can type the command ipconfig /all . Windows 95/98 users can run the command winipcfg . Linux/UNIX users can type ifconfig .
Once you have determined the client's Ethernet address, click on the link to create a new hostname for a local host. Add the hostname of the target system, the Ethernet address along with the desired IP address into the web panel. From this point on specified IP address will only be provided to a client system with the matching Ethernet address.