7.4. Configuring Your E-mail Application
Each user's e-mail application requires information about that user's account, where to send outgoing e-mail and pick up incoming e-mail. This information is usually entered in the "preferences" or "options" section. Most e-mail applications require you to enter the following information:
User's e-mail address: The user's e-mail address is the user account as created in the server manager plus the @domain name. Typically it will be in the form of username@yourdomain.xxx (e.g. afripp@tofu-dog.com).
E-mail server or outgoing e-mail SMTP server: This is the name of the e-mail server from the server. Normally you should just enter mail here. If you prefer, you should also be able to use the full domain name of mail.yourdomain.xxx (e.g. mail.tofu-dog.com).
E-mail account name or user name: this is the name before the @ in the e-mail address. For example, the username for "afripp@tofu-dog.com" is " afripp ".
If you choose POP3 e-mail service:
Enable POP3 protocol: Typically, to enable the POP3 protocol for incoming e-mail, you click on the POP3 checkbox or select POP3 from a pull-down menu in the section of your e-mail application dedicated to the incoming e-mail server.
Disable IMAP protocol: To disable the IMAP protocol for outgoing mail (not all e-mail applications have IMAP protocol) click the IMAP checkbox "off".
Delete read e-mail from server: We recommend you configure your e-mail application so e-mail that has been read is not left on the server. To do this, click off the checkbox marked "leave mail on server" or click on the checkbox marked "delete mail from server".
If you select IMAP e-mail:
Enable IMAP protocol: Typically, to enable the IMAP protocol for incoming e-mail (note that not all e-mail applications offer IMAP support) you click on the IMAP checkbox or select IMAP from a pull down menu in the section of your e-mail application dedicated to the incoming e-mail server.
Disable POP3 protocol: To disable the POP3 protocol for outgoing mail, click the POP3 checkbox "off".
The images below show you the sequence in Netscape. First you choose Preferences from the Edit menu and click on Mail Servers as shown in:
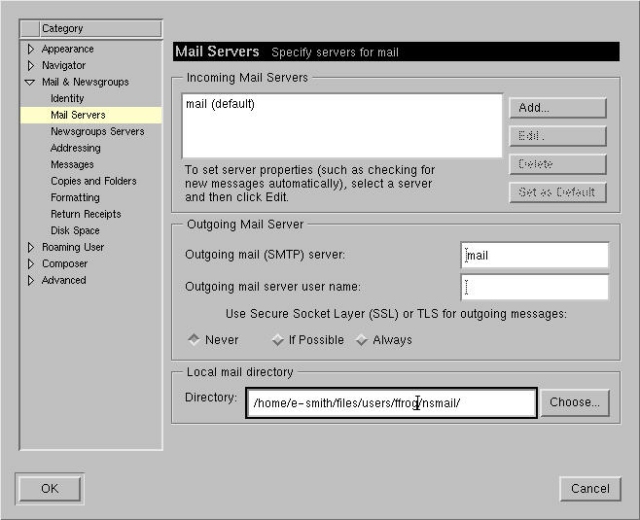
If you have not configured a mail server yet, you will need to press the Add button and enter information about your server. Otherwise, you will select the default mail server listed and click on the the Edit button. This will bring up a screen where you enter the user name and choose whether you are using IMAP or POP3:

Netscape should now be ready to send and receive e-mail.