14.3. Creating an i-bay
No matter how you are going to use an i-bay, the process of creating an i-bay starts by clicking on the "Click here" link at the top of the Information Bays panel in the server manager. You will be presented with the form shown in the image below.
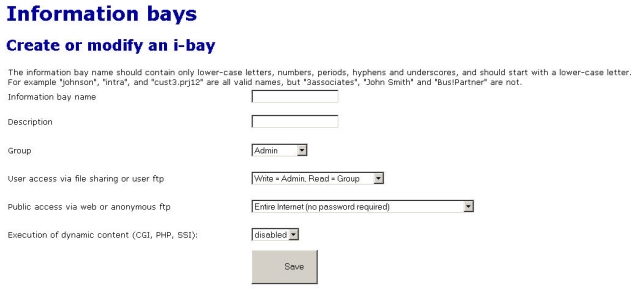
You now need to fill out the form providing the information and making the choices described below. Note that the ftp access described below can be overridden by the FTP access limits setting on the Remote access panel of the server manager. If you choose to "Disable public FTP access" there, ftp access for individual i-bays will not be allowed, even though you will appear to be able to enable it from the i-bay configuration screen.
-
Information bay name: This is the short name of the i-bay (subject to the 12-character length restriction mentioned earlier). The i-bay name will be what users will enter in the URL after the hostname to access the i-bay from the web. For instance, if public access is enabled, an i-bay named 'intranet' can be accessed by the Pagan Vegan staff at 'http://www.tofu-dog.com/intranet/'.
-
Brief description: This text will appear in various administrative screens and can be a useful reminder of the i-bay content.
-
Group: Ownership of the i-bay content is assigned to an existing group. The group ownership plays a role in the next setting for user access.
-
User access: You need to decide who will be able to add and modify content in the i-bay and who will be able to read the content.
-
Public access: Here you set what type of public access you wish to have for the i-bay. If the i-bay is just to be used by a small group of users, you can leave public access set to the default of None . If you want others to be able to access the i-bay via web or anonymous ftp, you can choose to allow access to just the local network or the wider Internet. You also can choose whether or not you wish to require a password.

Note If you choose one of the modes of Public access via web or anonymous ftp that requires a password, public access will not be available until you set the i-bay password from the main information bay panel in the server manager. Once you do so, users can access the i-bay through their web browser or ftp by using the i-bay name and i-bay password, rather than their own user name and password.
-
Execution of CGI scripts: If you want to use CGI scripts to add functionality to your web site, you can execute those scripts from the cgi-bin directory of your i-bay. However, for security reasons you must first choose enabled here to allow such scripts to be executed.
Once done filling out the form, click the Create button and the server manager will create your i-bay. If you wish to change these settings at any later point, you can click on Modify next to the i-bay name in the information bays panel of the server manager.